Recovery from the Windows 7 desktop screen
If Windows 7 opens correctly, perform the following steps to start a system recovery from the Windows 7 start menu.
-
Turn off the computer.
-
Disconnect all connected devices and cables such as Personal Media Drives, USB drives, printers, and faxes. Remove media from internal drives, and remove any recently added internal hardware. Do not disconnect the monitor, keyboard, mouse, or power cord.
-
Turn on the computer.
-
Click Start
 , click All Programs, click Recovery Manager, and then click Recovery Manager again.If you are prompted for an Administrator password or confirmation, type the password or provide confirmation. If a User Account Control window asks if you want to allow the program to make changes to the computer, click Yes.Figure : Recovery Manager
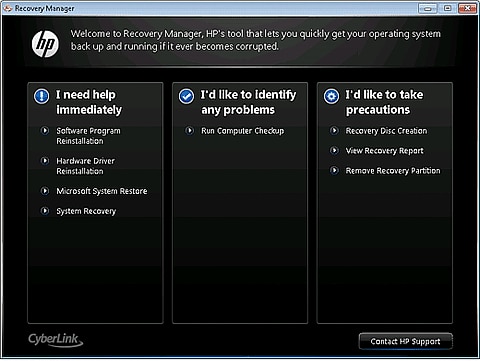
-
Under I need help immediately, click System Recovery.
-
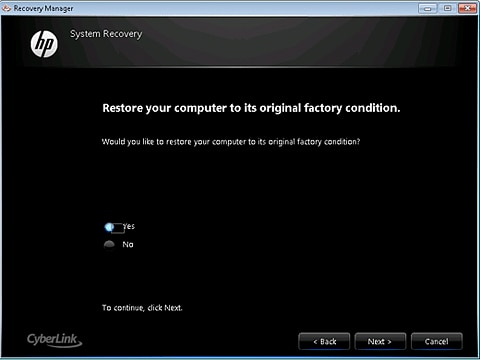
The Recovery Manager asks if you want to restore the computer to its original factory shipped condition. Click Yes, and then click Next.Figure : Recovery Manager confirmation screen
-
The computer restarts. If the recovery partition on the hard disk drive is functioning correctly, the Recovery Manager window appears.
note:
If the recovery partition on the hard disk drive is not functioning correctly, a set of recovery discs is needed to run a system recovery. Follow the instructions listed in the section Recovery from recovery discs.Figure : Recovery Manager after restart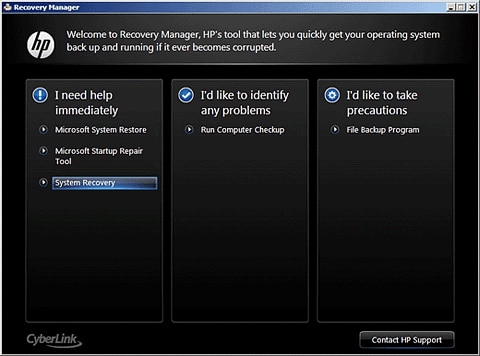
-
Click System Recovery.
-
When System Recovery prompts you to back up your files, select a backup option:
-
If you have already backed up personal files or you do not want to back up personal files, select Recover without backing up your files, and then click Next. Continue to the next step.
-
-
Click OK in the warning that appears.
-
After the system recovery is complete, click Finish to restart the computer. Complete the setup screens and wait until the computer finishes the setup.
-
Once the setup is complete, turn off the computer, reconnect all devices and cables, and then turn on the computer.
-
Before using the computer, update and protect your computer. Reinstall any virus and security software that was installed before the system recovery.
-
Reinstall any software programs that were added after purchasing the computer, as well as any files that were backed up.
Steps to follow for Recovery from the startup screen (during system boot) OR when unable to boot to login in screen
If Windows 7 does not open correctly, perform the following steps to recover the computer:
note:
If the recovery partition on the hard disk drive is not functioning correctly, this method does not work and an error message appears. If an error message indicates that System Recovery cannot be run from the startup screen, a set of recovery discs is needed to perform a system recovery. Follow the instructions listed in the section Recovery from recovery discs.
-
Turn off the computer.
-
Disconnect all connected devices and cables such as Personal Media Drives, USB drives, printers, and faxes. Remove media from internal drives, and remove any recently added internal hardware. Do not disconnect the monitor, keyboard, mouse, or power cord.
-
Turn on the computer and repeatedly press the F11 key, about once every second, until Recovery Manager opens.Figure : Recovery Manager

-
Under I need help immediately, click System Recovery.
-
When System Recovery prompts you to back up your files, select a backup option:
-
If you have already backed up personal files or you do not want to back up personal files, select Recover without backing up your files, and then click Next. Continue to the next step.
-
-
Click OK in the warning that appears.
-
After the system recovery is complete, click Finish to restart the computer. Complete the setup screens and wait until the computer finishes the setup.
-
Once the setup is complete, turn off the computer, reconnect all devices and cables, and then turn on the computer.
-
Before using the computer, update and protect your computer. Reinstall any virus and security software that was installed before the system recovery.
-
Reinstall any software programs that were added after purchasing the computer, as well as any files that were backed up.
Recovery from recovery discs
Perform the following steps to recover the computer
using a set of recovery discs (either CDs or DVDs). These discs can be a
set that was received from HP Support or discs that you created.
note:
HP does not include recovery discs in the box its personal computers as the recovery software comes on the hard drive. You can obtain recovery discs from HP Support, or use Recovery Manager software to create a set of recovery discs yourself. HP recommends creating a set of recovery discs when you receive your computer and storing them in a safe place. Support Sent Recovery Discs can take as long as 4 to 6 hours to complete system recovery, but recovery discs that you create often take less time to complete system recovery. For more information about creating a set of recovery discs, see Creating Recovery Discs or Saving a Recovery Image to a USB Flash Drive in Windows 7.
-
Turn on the computer, and insert the first recovery disc into the drive.
-
Press and hold the power button to turn off the computer.
-
Disconnect all connected devices and cables such as Personal Media Drives, USB drives, printers, and faxes. Remove media from internal drives, and remove any recently added internal hardware. Do not disconnect the monitor, keyboard, mouse, or power cord.
-
Turn on the computer.
-
Immediately press the Escape key repeatedly, about once every second, until a Startup Menu or Select boot device menu opens.
-
The selections you need to make vary slightly depending on the type of menu that appears on your screen:
-
If a Select Boot Device menu displays, use the up or down arrow key to select the CD/DVD drive, and then press Enter to continue.
-
If a Startup Menu opens, press F9 to open "Boot Menu" or "Boot Device Options". Use the up or down arrow key to select the CD/DVD drive. Then press Enter.
note:
More than one CD/DVD drive selection may be available from the list of bootable devices. If so, select one of the CD/DVD selections from the list to see if HP Recovery starts. If recovery does not start or a non-system disk error displays, restart the computer by pressing the power button and then repeat these steps to select another CD/DVD drive. When recovery starts, continue using the steps to complete recovery.
-
-
A window might appear and prompt you to choose whether to run Recovery Manager from the hard disk or from the disc inserted. If this window displays, select the Run program from disc, and then click Next.
-
Select an option based on the type of recovery discs you have:
-
Recovery discs received from HP support:Select one of the following selections, depending on which selection is shown on your screen, and then click Next.
-
Factory Reset - Reset the computer by erasing the entire drive and restoring to the factory setup
-
Reset the computer by erasing the entire drive and restoring to the factory setup
Figure : Recovery Manager using HP-sent recovery discs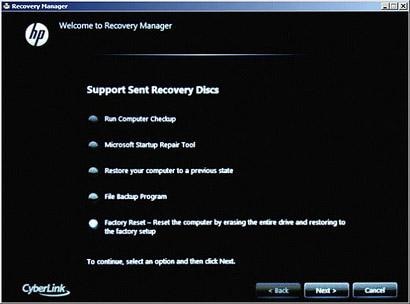
-
-
-
When System Recovery prompts you to back up your files, select a backup option:
-
If you have already backed up personal files or you do not want to back up personal files, select Recover without backing up your files, and then click Next. Continue to the next step.
-
-
Click OK in the warning that appears.
-
Read and respond to the screens as they appear. If a screen prompts for a disc, insert the next disc. In some cases, you might have to repeatedly insert the same disc several times before the screen allows you to continue.
-
After system recovery is complete, remove the disc. If the tray does not eject the disc, press the eject button on the PC case to eject the disc.
-
If you are presented with a “Restoration complete” screen, click Finish.If you are presented with a “File copy is complete” screen, click Next.
-
Depending on which model of computer you have, the computer will either shut off or restart. If the computer shuts off, wait 5 seconds and turn on the computer.
note:
If you are using Support Sent Recovery discs sent from HP, it can take more than an hour to complete the recovery process. Do not interrupt the recovery process. The recovery process is complete when the Windows Setup screens appear. -
Complete Windows setup when the screens appear.
-
Once Windows setup has been completed, turn off the computer, reconnect all devices and cables, and then turn on the computer.
-
Before using the computer, update and protect your computer. Reinstall any virus and security software that was installed before the system recovery.
-
Reinstall any software programs that were added after purchasing the computer, as well as any files that were backed up.
Booting from USB recovery drive
Perform the following steps to recover the computer using a USB flash drive.
note:
For more information about saving a recovery image to a USB flash drive, see Creating Recovery Discs or Saving a Recovery Image to a USB Flash Drive in Windows 7.
-
Turn on the computer, and insert the USB flash drive into a USB port.
-
Turn off the computer by pressing and holding the power button.
-
Disconnect all connected devices and cables such as Personal Media Drives, printers, and faxes. Remove media from internal drives, and remove any recently added internal hardware. Do not disconnect the monitor, keyboard, mouse, USB recovery flash drive, or power cord.
-
Immediately press the Escape key repeatedly, about once every second, until a Startup or Select Boot Device Menu opens.
-
The selections you need to make vary slightly depending on the type of menu that appears on your screen:
-
If a "Select Boot Device" menu displays, use the up or down arrow key to select your USB Storage Device, and press Enter to continue.
-
If a "Startup Menu" opens, press F9 to open the "Boot Menu" or "Boot Device Options". Use the up or down arrow key to select the name of your USB Storage Device (the volume label of the drive). Then press Enter to continue.
Figure : Recovery Manager welcome
-
-
A window might display and prompt you to choose whether to run Recovery Manager from the hard disk or from the media inserted. If this window displays, select the USB flash drive option, and then click Next.
-
Click System Recovery under I need help immediately. On the next screen, select Yes to confirm that you want to restore your computer to its original factory condition, and then click Next to continue.Figure : Restore computer verification

-
When System Recovery prompts you to back up your files, select a backup option:
-
If you have already backed up personal files or you do not want to back up personal files, select Recover without backing up your files, and then click Next. Continue to the next step.
-
-
Click Next. A message displays warning you that all devices should be disconnected from the PC. Be sure all devices, except the recovery flash drive, are disconnected, and then click OK.
-
Read and respond to the screens as they appear. After system recovery is complete, a “Restoration complete” screen displays.
-
Remove the USB flash drive from the USB port.
-
Click Finish to restart your computer.
-
Depending on the model of your computer, the computer will either shut off or restart. If the computer shuts off, wait 5 seconds, and then turn on the computer.
-
Complete Windows setup when the screens appear.
-
Once Windows setup has been completed, turn off the computer, reconnect all devices and cables, and then turn on the computer.
-
Before using the computer, update and protect your computer. Reinstall any virus and security software that was installed before the system recovery.
-
Reinstall any software programs that were added after purchasing the computer, as well as any files that were backed up.
- Sumber : http://support.hp.com/us-en/document/c01867418
1 Komentar
This is really nice. Thanks for sharing this informative article.
Balas123 HP ojp6968